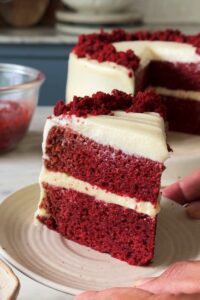
My no-oven red velvet cake, made right in a saucepan, is a delightful twist on the classic. I start with a rich, velvety batter that combines cocoa powder, buttermilk to create that signature tangy flavor. Cooking it slowly in the saucepan allows the cake to become perfectly moist and tender, with a deep, satisfying red hue. I top it off with a luscious cream cheese frosting that adds a sweet and tangy finish. It’s a beautifully simple way to enjoy a classic favorite, all without needing an oven.
WHAT YOU’LL LOVE ABOUT THIS
- Eggless
- No oven required
- Easy and quick
- No fancy ingredients required
- Best red velvet cake recipe

INGREDIENTS USED IN NO OVEN RED VELVET CAKE
BUTTERMILK
While you can use store-bought buttermilk as a substitute for eggs in this red velvet cake recipe, I have seen how cakes come out better with home-made buttermilk. In this recipe, I’ve used ½ cup milk + ½ tbsp. vinegar. Buttermilk is something that makes or breaks your red velvet cake!
SUGAR
Sugar plays a crucial role in the creation of a red velvet cake, contributing not only to its sweetness but also to its texture, moisture, and overall chemistry. It balances the cocoa’s subtle bitterness and enhances the overall flavor profile, creating that perfect blend of sweetness without being overwhelming.
RED LIQUID COLOR
Liquid Color is super-duper important for this red velvet cake. Take care that you are using a good quality gel color or liquid color. The thing about liquid color is that if it is of a good brand, it is highly pigmented and very less quantity has to be used. I use this gel color but there are endless low quality colors available in the market. Make sure you don’t get them as not only are they practically useless in dispensing colors, they are also harmful to the health.
COCOA POWDER
Cocoa powder is a very important ingredient in this small serve Red Velvet Cake. A lot of professional bakeries use dark, rich cocoa powder and that does not work here. The red color- if it’s not of an extremely good company, your dark cocoa powder will turn this Red Velvet Cake into a chocolate velvet cake. Hehe.
LEAVENING AGENTS
Baking soda, or sodium bicarbonate, is an alkaline chemical leavener that reacts with acid and heat to leaven food. In this recipe, buttermilk and cocoa powder are the examples of acidic components that activate baking soda.
ALL-PURPOSE FLOUR
Flour helps absorb the moisture from other ingredients in the batter, which contributes to the cake’s texture and prevents it from being overly wet. It interacts with leavening agents like baking powder and baking soda to create gas (usually carbon dioxide) that causes the cake to rise. Flour is a primary structural ingredient in cakes. It provides the framework for the cake’s crumb and gives it a cohesive texture. It also produces a tender crumb in the cake.
EQUIPMENTS USED TO NAKE NO OVEN RED VELVET CAKE
Measuring Cups and Measuring Spoons are the first thing that anybody needs. The right quantities will help in the desired outcome so these two things are a must.
Other basics that are required are mixing spoons, whisks and spatulas for an easy process.
A 6inch saucepan to bake the cake.

OTHER RELATED RECIPES FROM THE BLOG
TIPS TO MAKE NO OVEN RED VELVET CAKE
- Make sure to sift the dry ingredients to incorporate some air.
- While frosting the cake, make sure it’s completely cooled before adding frosting.
- Choose a heavy-bottomed saucepan to prevent burning or uneven cooking. A non-stick saucepan works well for this purpose.
- Cover the saucepan with a lid and cook on low heat. Check occasionally to ensure the cake is cooking evenly. It will take longer than baking in an oven, so be patient.
- Insert a toothpick or skewer into the center of the cake to check if it comes out clean, indicating the cake is cooked through.
- Make sure to grease your cake pans thoroughly to prevent sticking. Use parchment paper rounds at the bottom for easier removal.
- Mix the batter until just combined. Over-mixing can result in a dense cake.
HOW TO BAKE IT IN THE OVEN
- Preheat oven at 180 degrees for 5-7 minutes
- Grease a 6-inch pan with oil and line it with parchment paper.
- Pour the batter into the prepared pan.
- Bake at 180 degrees for 30-35 mins or till a skewer Inserted in the centre comes out clean.

- 1+1/4 cup milk, warm
- 2 tbsp white vinegar
- 1 cup castor sugar
- ½ cup sunflower oil
- ¼ cup yogurt/ homemade curd
- ½ tsp red gel food colour
- 1+ ½ cup all purpose flour
- 1 tbsp cocoa powder
- 1 tsp baking soda
- For the cream cheese frosting
- 1+1/2 cup (338g) butter, softened
- 1 tsp vanilla extract
- ¾ cup cream cheese, softened
- 3 cups icing sugar
- Start by mixing warm milk and vinegar together. If you don’t have vinegar you can use same quantity of lemon juice. Let it rest for 5 minutes and you’ll see it will began curdling. Set this aside.
- In a bowl, add castor sugar, vegetable oil, yogurt, buttermilk and red gel food colour. Mix everything together until well combined.
- Now add sifted dry ingredients - all purpose flour , cocoa powder and baking soda and mix well until you don’t see any large flour pockets in the batter.
- Pour the batter in a 6 inch saucepan greased with sunflower oil or butter and lined with parchment paper.
- Now, take a tawa or frying pan set over low to medium heat and place the saucepan over it and cover it with a lid. Bake it for 45-50 mins or until a skewer inserted in the centre comes out clean.
- For the cream cheese frosting, start by adding softened butter and vanilla extract in a bowl. Beat it with an electric whisk until it becomes light and fluffy. Next, add softened cream cheese and beat again until fully combined.
- Gradually add sifted icing sugar to the butter and cream cheese mixture, mixing it in slowly and in parts. Continue mixing until everything is well combined. Chill the buttercream in the refrigerator until the cake has baked and cooled.
- After the cake is baked, let it cool to room temperature before demoulding it from saucepan. Decorate the cake with the prepared buttercream and enjoy!
If you like my no oven red velvet cake recipe and happen to make them in your kitchen, do tag me on Instagram and share pictures with me using #Bakewithshivesh. Happy Baking!

 Hello. I'm Shivesh Bhatia, a food blogger and food stylist from Delhi, India. Welcome to Bake With Shivesh, where I'll help you create magic in your kitchens with my simple recipes.
Leave a Reply