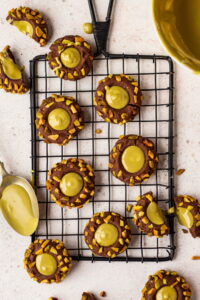
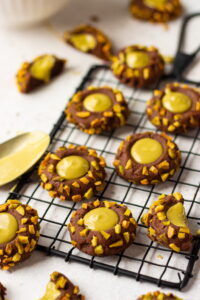
These Pistachio Thumbprint Cookies are an absolute favorite of mine every bite feels like pure indulgence! The base is a rich, chocolatey cookie, soft in the center with just the right crisp edges. But the real magic happens in the middle a creamy, dreamy pool of pistachio butter that melts perfectly into the cookie. And to top it all off, a sprinkle of finely chopped pistachios for that extra crunch and nutty burst of flavor. Chocolate and pistachio are a match made in dessert heaven, and these cookies are proof of that! Trust me, youll want to make a double batch.
WHAT YOU’LL LOVE ABOUT THIS
- Eggless
- Easily customisable
- Perfect pistachio flavour
- Easy to make
INGREDIENTS USED IN MAKING PISTACHIO THUMBPRINT COOKIES
FLOUR
Flour plays a crucial role in these Pistachio Thumbprint Cookies, providing structure and stability to the chocolate cookie base. It binds the ingredients together, ensuring the dough holds its shape while baking, while also contributing to the soft, slightly chewy texture. The right balance of flour is key too much can make the cookies dry and crumbly, while too little may cause them to spread too much. In this recipe, flour works alongside cocoa powder to create a rich, tender bite that perfectly complements the creamy pistachio butter filling.
COCOA POWDER
Cocoa powder is what gives these Pistachio Thumbprint Cookies their deep, rich chocolate flavor. It blends seamlessly into the dough, adding a slight bitterness that perfectly balances the sweetness of the cookie. Beyond flavor, cocoa powder also affects the texture it helps create a tender, slightly crumbly bite while keeping the cookies soft in the center.
BUTTER
Butter is the heart of these Pistachio Thumbprint Cookies, bringing richness, flavor, and that melt-in-your-mouth texture. It helps create a soft, tender cookie with just the right amount of crispness around the edges. When creamed with sugar, butter traps air, making the dough light and giving the cookies a delicate crumb.
ICING SUGAR
Icing sugar plays a key role in these Pistachio Thumbprint Cookies, contributing to their delicate texture and smooth sweetness. Unlike granulated sugar, icing sugar dissolves effortlessly into the butter, creating a tender, melt-in-your-mouth cookie without any grittiness. It also helps achieve a slightly softer, more refined crumb, making the chocolate base feel light yet rich. Plus, its fine texture ensures that the dough stays smooth, allowing the pistachio butter filling to shine without being overpowered by excessive sweetness.
PISTACHIO PASTE
Pistachio paste is the star of these Pistachio Thumbprint Cookies, bringing a luxurious, nutty richness that perfectly complements the chocolate base. Made from finely ground pistachios, it has a naturally smooth, buttery texture and an intense pistachio flavor with subtle sweetness. Its creamy consistency makes it the perfect filling, melting slightly into the cookie as it bakes while still holding its shape. The slight earthiness of the pistachio paste balances the deep cocoa notes, creating a sophisticated flavor combination.
EQUIPMENTS USED IN MAKING PISTACHIO THUMBPRINT COOKIES
A a few kitchen staples that should always be there in the kitchen are mentioned below.
Measuring Cups and Measuring Spoons are the first thing that anybody who in cooking or baking needs. The right quantities will help in the desired outcome so these two things are a must.
A whisk is necessary to mix all the ingredients. Spatulas are useful to scrape down the filling.
RELATED RECIPES FROM THE BLOG
TIPS TO MAKE PISTACHIO THUMBPRINT COOKIES
- Creaming room-temperature butter with icing sugar ensures a smooth, well-incorporated dough. Cold butter wont blend properly, and melted butter will make the cookies spread too much.
- Chilling the dough for at least 30 minutes helps the cookies hold their shape while baking. It also enhances the flavors and prevents excessive spreading.
- Use your thumb, the back of a teaspoon, or a small round measuring spoon to create uniform indentations. If cracks form, gently smooth them out to keep the cookies neat.
- For a cleaner look and a fresher pistachio flavor, bake the cookies first, then pipe or spoon the pistachio paste into the thumbprints.
- A sprinkle of finely chopped pistachios on top adds crunch and enhances the nutty aroma. You can also drizzle with melted chocolate for an extra indulgent touch!
- 1 cup all-purpose flour
- ¼ cup cocoa powder
- ½ cup butter, softened
- ½ cup icing sugar, sifted
- For the pistachio butter
- 2 cups pistachio kernels
- 1–2 tablespoons oil
- For the garnish
- ¼ cup pistachios
- Preheat the oven to 180°C and line a baking tray with parchment paper or a silicone mat.
- In a bowl, sift together the be flour and cocoa powder until well combined.
- In a separate bowl, cream together the softened butter and sugar until light and fluffy. You can use an electric mixer or a whisk.
- Gradually add the dry ingredients to the butter–sugar mixture and mix until a soft dough forms. Be careful not to over mix.
- Take small portions of the dough (about 1 tablespoon) and roll them into balls. Place the dough balls on the prepared baking tray, spacing them a few inches apart.
- Use your thumb or the back of a teaspoon to create an indent in the centre of each dough ball.
- Make sure not to press too hard, as you don’t want the cookie to
- crack or lose its shape.
- Sprinkle some finely chopped pistachios over the cookies, lightly pressing them into the dough.
- Place the baking sheet with the cookies into the preheated oven and bake at 180°C for approximately 10–12 minutes, or until the cookies are set and slightly firm to the touch.
- Once baked, remove the cookies from the oven and allow them to cool on the baking sheet for a few minutes. Then transfer them to a wire rack to cool completely.
- For the pistachio butter, preheat the oven to 175°C. Spread the pistachios evenly on a baking sheet, making sure they are in a single layer. Roast the pistachios in the preheated oven for about 10 minutes until they are lightly golden and fragrant. Keep a close eye on them to prevent burning.
- Once roasted, remove the pistachios from the oven and let them cool completely. This step is important as it prevents the pistachios from becoming oily and helps them blend better.
- Transfer the cooled pistachios to a food processor or high-powered blender. Start blending at low speed and gradually increase to high speed. Stop and scrape down the sides of the container with a spatula occasionally to ensure even blending.
- As you blend the pistachios, you will notice the mixture transforming from a crumbly texture to a smoother consistency. At this point, add 1–2 tablespoons of neutral-flavored oil to help bind the pistachios and create a creamy texture.
- If the pistachio butter is too thick, you can add a little more oil to thin it down. Similarly, if it is too thin, you can add more roasted pistachios to thicken it. Once the cookies are completely cooled, fill the indent with a small spoonful of pistachio butter.
- Let the pistachio butter sit for a few minutes to set.
If you like my pistachio thumbprint cookies recipe and happen to make them in your kitchen, do tag me on Instagram and share pictures with me using #Bakewithshivesh. Happy Baking!
FOR MORE INDULGENT RECIPES, YOU CAN ALSO ORDER MY NEW BOOK “CHOCOLATE” NOW.

Leave a Reply