In the realm of dessert delights, few creations captivate the senses and elevate the palate quite like a luscious cheesecake. But what happens when you infuse this classic treat with the rich, nutty essence of hazelnuts and the decadent allure of a no-bake preparation? Enter the realm of indulgence elevated – welcome to the world of no-bake hazelnut cheesecake.
But this isn’t just any cheesecake. Oh no, this is a no-bake masterpiece, meticulously crafted to deliver maximum flavour and satisfaction with minimal effort. Gone are the days of fretting over water baths and cracked surfaces – with this recipe, you’ll achieve cheesecake perfection in no time, without ever turning on the oven.
This no-bake hazelnut cheesecake offers a reprieve from traditional baking methods, allowing you to create a masterpiece with minimal effort and maximum indulgence.
INGREDIENTS USED IN HAZELNUT CHEESECAKE
Chocolate Biscuits
A cheesecake is incomplete without a biscuit base. Chocolate biscuits add a rich, cocoa flavour to the crust of the cheesecake, enhancing its overall taste profile. The combination of chocolate and hazelnut creates a decadent and indulgent flavour experience. Crushed chocolate biscuits provide a crunchy and crumbly texture to the crust, contrasting with the smooth and creamy filling of the cheesecake.
Melted butter
Melted butter serves as a binding agent for the crust. When combined with crushed chocolate biscuits, it creates a mixture that sticks together, helping to form a cohesive and solid base for the cheesecake.
Whipping Cream
The main ingredient that gives the cheesecake its entire structure and base is the whipping cream. It is whipped up to stiff peaks before any other ingredient is added to it so that it maintains its light and airy texture. This makes the cheesecake get its real texture and feel. I have used this whipping cream to make this recipe.
Cream Cheese
Since it’s a cheesecake recipe, it can’t go without adding the main ingredient for cheesecake, which is the cream cheese. Cream cheese adds the smoothness and extra creamy texture to the cheesecake and makes it more flavourful. I have used D’lecta cream cheese to make this Hazelnut Cheesecake but you can use any cream cheese of your choice.
Hazelnuts
Hazelnuts impart a rich, nutty flavour to the cheesecake, adding depth and complexity to the dessert. Their distinct taste shines through in every bite. Finely chopped or ground hazelnuts add a delightful crunch to the crust of the cheesecake. They are rich in healthy fats, vitamins, minerals, and antioxidants, making them a nutritious addition to the cheesecake.
Chocolate
Melted chocolate serves as a primary source of rich and intense chocolate flavour in the cheesecake. The smooth, velvety texture of melted chocolate infuses the entire dessert with a luxurious and decadent taste. When combined with other ingredients like cream cheese and whipped cream, it helps the cheesecake firm up during the chilling process.
EQUIPMENTS USED IN MAKING HAZELNUT CHEESECAKE
A few kitchen staples that should always be there in the kitchen are mentioned below.
Measuring Cups and Measuring Spoons are the first thing that anybody who in cooking or baking needs. The right quantities will help in the desired outcome so these two things are a must.
A blender is required to crush the biscuits too. You can use a zip lock pouch and rolling pin too to crush the biscuits.
An electric beater is necessary to blend all the ingredients into a smooth cheesecake batter.
You also need a few mixing bowls to combine the biscuit base and cheesecake batter. You also need spatulas to do the mixing.
RELATED RECIPES FROM THE BLOG
TIPS TO MAKE THIS HAZELNUT CHEESECAKE
- Whip the cream till stiff peaks are achieved. Do not over whip or under whip or you’ll not get the desired texture.
- Use softened cream cheese so that the final cheesecake batter doesn’t have lumps.
- Chill the crust in the refrigerator for about 15-30 minutes before adding the filling. This helps the crust set and prevents it from becoming too soggy.
- Gently fold the whipped cream into the cream cheese mixture to maintain the light and fluffy texture. Use a spatula and make sure to incorporate the ingredients thoroughly without deflating the whipped cream.
- Add hazelnut flavour to both the filling and the crust for a more pronounced hazelnut taste. You can use hazelnut liqueur, hazelnut extract, or finely ground hazelnuts for this purpose.
- For the base -
- 25 chocolate biscuits
- ¼ cup hazelnuts
- 6 tbsp butter (75g), melted
- For the cheesecake batter -
- ¾ cup chocolate (130 g), melted
- 1+1/2 cup cream cheese (338g) , softened
- 1+ ½ cup whipped cream (whip ¾ cup whipping cream till soft peaks)
- Chocolate layer -
- ⅓ cup hazelnuts, chopped
- 2 cup fresh cream
- 1 cup chocolate, chopped
- In a blender, combine chocolate biscuits and hazelnuts. Blend until they form a fine powder.
- Add melted butter to this and mix well.
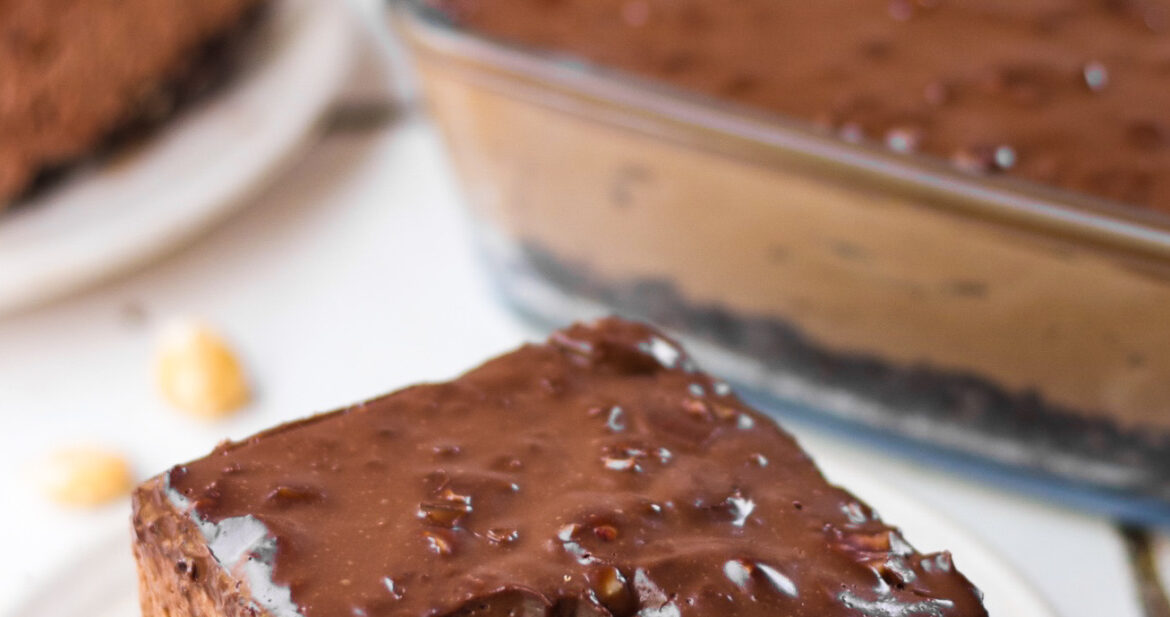
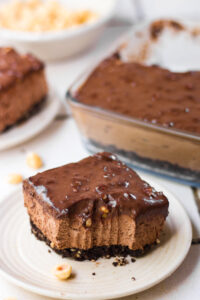
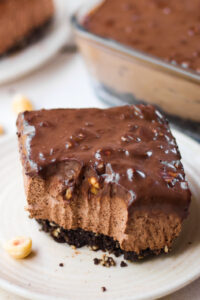
- Press the mixture into a 6x6 square glass dish, then refrigerate it while you prepare the cheesecake mixture.
- For the filling- In a bowl, add softened cream cheese and melted chocolate. Mix this using an electric whisk or spatula.
- Now, fold in the whipped cream into the chocolate cream cheese mixture.
- Transfer the prepared cheesecake batter onto the biscuit base and spread it out into an even layer. let the cheesecake refrigerate for at least 2-3 hours.
- For the hazelnut chocolate ganache, heat the fresh cream in a saucepan over medium heat, then pour it over chopped chocolate. Let it sit until all the chocolate melts, then whisk it together. Finally, add chopped hazelnuts to this ganache.
- Once the cheesecake is set, apply a generous layer of hazelnut ganache on the top.
If you like my Hazelnut Cheesecake recipe and happen to make them in your kitchen, do tag me on Instagram and share pictures with me using #Bakewithshivesh. Happy Baking!
Craving more tasty treats? Grab one of my published books from the links below and let’s get baking!
- Bake with Shivesh- Here
- A Cookbook For Special Days, Special People – Here
- Eggless Baking With Shivesh- Here
- Desserts For Every Mood- Here

Leave a Reply