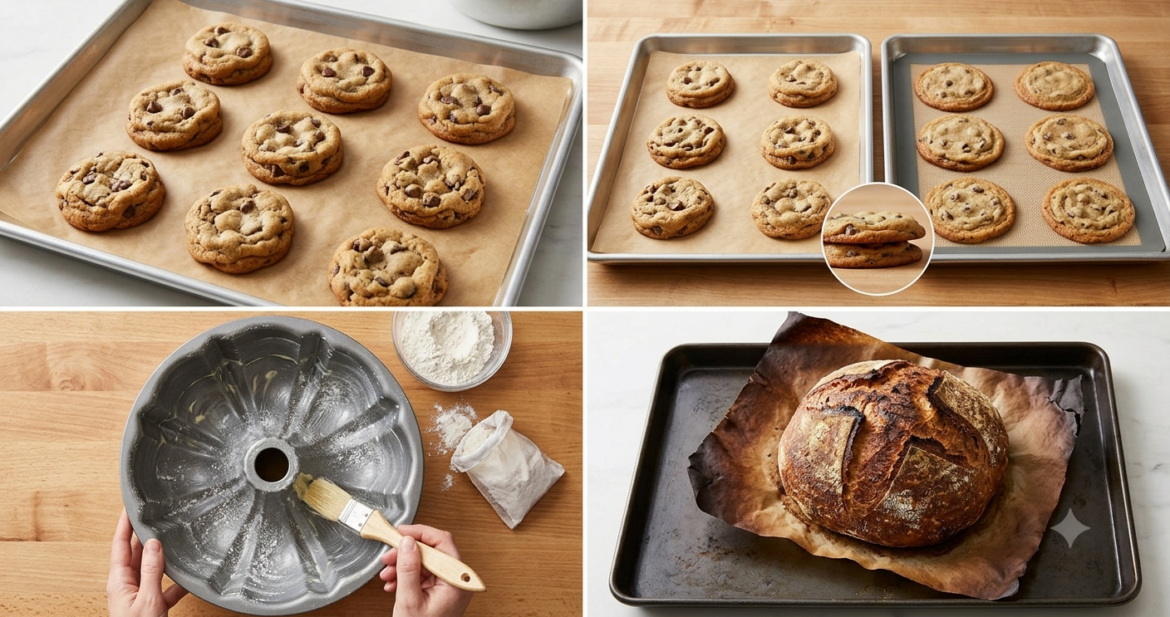
We have all been there. You spend an hour carefully creaming butter, measuring flour to the exact gram, and folding in expensive dark chocolate chunks. You slide the tray into the oven, set your timer, and walk away feeling like a pastry chef.
Ten minutes later, you peek through the oven glass—and your heart sinks. Your thick, bakery-style cookies have melted into one giant, paper-thin cookie puddle. Or worse, your delicate sponge cake is welded to the bottom of the pan like superglue.
When a bake goes sideways, we usually blame the recipe, the oven, or the butter. Almost nobody blames what is sitting between the dough and the metal.
Yet your pan liner acts like the tires on a car—it controls grip, heat transfer, and how your bake moves as it cooks. Choosing between parchment paper, a silicone baking mat (like a Silpat), and good old-fashioned butter and flour isn’t just about easy cleanup. It actively changes the texture, browning, and shape of your food.
Here is the real, no-nonsense breakdown of what happens on each surface, why silicone mats secretly make cookies spread, and exactly which one you should reach for next time you preheat your oven.
1. Parchment Paper: The Reliable Everyday Hero
If you walk into almost any professional bakery, you will see stacks of pre-cut parchment sheets everywhere. Parchment paper is cellulose paper coated in a ultra-thin layer of silicone, making it heat-resistant (usually up to 420°F–450°F / 215°C–230°C), grease-resistant, and reliably nonstick.
Why Bakers Love It
-
Controlled Grip: Parchment has a tiny bit of microscopic texture. As cookie dough melts in the oven, the paper gives it just enough friction to hold onto, helping your cookies bake up thicker with chewy centers and crisp edges.
-
Even Browning: Because it is paper-thin, heat transfers cleanly from the metal pan into the bottom of your bake without insulating it too much.
-
The “Sling” Trick: When baking brownies, blondies, or bar cookies, leaving a two-inch overhang of parchment on the sides lets you lift the entire block out of the pan cleanly for effortless slicing.
-
Zero Scrubbing: When you are done, you toss it in the compost or trash. Done.
Where It Falls Short
-
High-Heat Roasting: Above 450°F (230°C), parchment turns dark brown, gets brittle, and can scorch or smoke—especially under a broiler.
-
Rolling Curls: If you buy it on a roll instead of flat sheets, it loves to curl back up on you while you are trying to pipe delicate macarons or meringues. (Pro tip: Put a tiny dab of batter or water under the four corners of the paper to glue it flat to the pan!)
2. Silicone Baking Mats: The Reusable Heavyweight
Silicone mats—made of food-grade silicone reinforced with woven fiberglass mesh—feel like a dream for sustainability and zero-waste kitchens. You wash them, roll them up, and reuse them thousands of times.
However, silicone behaves very differently in the oven than paper does.
The Big Secret: Why Silicone Mats Make Cookies Spread More
If you bake the exact same batch of chocolate chip cookie dough on parchment paper versus a silicone mat, the silicone-mat cookies will come out wider, flatter, and paler on the bottom. Why? Two reasons:
-
Zero Friction (The Slip-and-Slide Effect): Silicone is ultra-slick. When butter in your cookie dough melts, it has nothing to grab onto. Instead of puffing upward, the dough hydroplanes outward across the smooth surface before the eggs and flour have time to set.
-
Thermal Insulation: Silicone is an insulator, not a heat conductor. It slows down how fast heat moves from your metal baking sheet into the bottom of the dough. Because the bottom takes longer to heat up and “set,” the butter melts completely before the structure solidifies—giving you extra spread and a softer, less-caramelized underside.
When Silicone Mats Actually Shine
Don’t banish your silicone mats to the back of the drawer just yet! That exact insulating, ultra-slick behavior makes them unbeatable for specific jobs:
-
Sticky Sugar & Caramel Work: Making peanut brittle, tuiles, melted sugar decorations, or sticky honey-glazed roasted nuts? Sugar releases effortlessly from silicone where it might tear or stick to cheap parchment.
-
Working with Sticky Doughs: Kneading wet bread dough, rolling out pie crust, or shaping sticky scones directly on a silicone mat turns your countertop into a nonstick workstation.
-
Lacy, Crispy Cookies: If you want ultra-thin, lacy oatmeal cookies or brandy snaps that spread wide and stay delicate, silicone is your best friend.
(Note: Never cut directly on a silicone mat with a knife or pizza cutter—one slice through the fiberglass mesh ruins the mat.)
3. Greasing the Pan (Butter, Oil, or Cooking Spray): The Old-School Classic
Before parchment paper and silicone mats took over home kitchens, greasing a pan with butter, shortening, or oil—and often dusting it with flour or cocoa powder—was the universal standard. And for certain bakes, nothing else comes close.
Why Direct Contact Matters
When batter touches a greased metal pan directly, there is zero barrier between the metal and your food. Heat shoots straight into the batter immediately.
-
Crispy Edges & Golden Crusts: Direct contact with hot, greased metal is what gives brownies their coveted chewy-crisp edges, cornbread its crunchy golden crust, and brioche rolls their rich, toasted bottoms.
-
Cake Climbing: When baking a layer cake, greasing the bottom (or lining the bottom with a parchment circle) while leaving the sides lightly greased—or even ungreased for angel food and chiffon cakes—gives the batter traction to climb up the walls of the pan as it rises.
The Mistakes That Cause Sticking
-
Using Cooking Spray on Nonstick Pans: Aerosol sprays (like PAM) contain soy lecithin, which builds up over time into a gummy, sticky varnish that ruins nonstick coatings and actually makes food stick worse later. Stick to softened butter, neutral oil, or shortening applied with a paper towel or pastry brush.
-
Forgetting the Flour Dusting for Intricate Pans: If you are baking a Bundt cake or madeleines with detailed ridges, parchment won’t fit. Brush softened butter into every single nook and cranny, then dust with flour (or cocoa powder for chocolate cakes) and tap out the excess.
The Quick Cheat Sheet: Which Surface Should You Use?
| What You’re Baking | Best Choice | Why It Works Best |
| Thick, Chewy Chocolate Chip Cookies | Parchment Paper | Gives dough traction so it puffs up instead of spreading flat; browns bottoms evenly. |
| Macarons & Meringues | Parchment Paper (or Silicone) | Parchment dries out the “feet” cleanly; silicone works too if you adjust baking time slightly. |
| Lacy Tuiles, Brittle & Caramel | Silicone Mat | Melted sugar peels right off without tearing or sticking. |
| Brownies & Bar Cookies | Parchment Paper | Use an overhang sling to lift the whole batch out cleanly for sharp slices. |
| Layer Cakes | Greased Pan + Parchment Circle | Grease the sides, line the bottom with parchment—guaranteed zero sticking every single time. |
| Bundt Cakes & Madeleines | Butter + Flour Dusting | Liquid fat gets into intricate grooves where paper can’t reach. |
| Cornbread, Focaccia & Cinnamon Rolls | Greased Pan (Butter or Olive Oil) | Direct metal contact creates a crispy, golden, flavorful crust. |
| High-Heat Veggies or Artisan Bread (450°F+) | Bare Pan or Cornmeal/Semolina | Exceeds parchment’s safe temperature limit and prevents smoking. |
Two Common Myths to Ignore
-
“Wax paper and parchment paper are the same thing.”Never put wax paper in the oven! Wax paper is coated in paraffin wax, which will melt onto your food, smoke up your kitchen, and potentially catch fire. Keep wax paper strictly for cold tasks like wrapping sandwiches or setting dipped chocolates on the counter.
-
“Greasing parchment paper makes it extra nonstick.”Unless a recipe specifically calls for greasing parchment (which occasionally happens with ultra-sticky meringues or sponge rolls), adding extra butter or oil on top of parchment paper just adds excess surface grease, causing cookies to spread faster and fry at the edges.
My Golden Rule in the Kitchen
If you want to keep things simple without overthinking every recipe:
-
Reach for parchment paper for 90% of your cookie sheets, roasting trays, and square brownie pans.
-
Save your silicone mats for sticky candy work, rolling out dough on the counter, or cookies you want to spread thin.
-
Break out the butter and flour whenever you are baking in shaped cake pans, Bundt tins, or cast iron where crispy, golden edges are the star of the show.
Next time a batch of cookies spreads a little too thin, check what’s underneath them before you blame your butter—switching from silicone to parchment might be the easiest kitchen upgrade you ever make.
 Hello. I'm Shivesh Bhatia, a food blogger and food stylist from Delhi, India. Welcome to Bake With Shivesh, where I'll help you create magic in your kitchens with my simple recipes.
Leave a Reply